
Building a simple Light box and drawing with it
Which child who loves painting and drawing hasn't leaned against a window with a pen and paper to trace a drawing? A light box or a light table are super practical and much more convenient alternatives, as I learned later on.
It helps enormously to have this tool at hand, especially when a sketch is to be converted into a clean contour tracing or parts of a drawing are to be transferred to a new sheet.
Of course you can also buy a ready-to-use electrical device for this, but where would be the fun in that?
How to easily build a rudimentary, low-budget light box yourself and draw with it - read about it in the following article!

First a look at the materials.
Four objects of the same shape and height, such as Styrofoam pieces or coffee cups, form the supports for a small plexiglass plate which will be our drawing surface.
A light source, e.g. a headlamp or flashlight (no candle!) and a paper handkerchief are also needed for the project.
And of course the drawing supplies are necessary!

Of course, the basic sketch or drawing to be copied and a fresh sheet of paper also play a central role. The thinner the paper, the more light can shine through and help you trace your sketch. I use 80g/m2 copy paper as I will be drawing with ink pens.
Thinner paper will definitely work! Thicker paper, for example for watercolors, is not inherently unsuitable, but may require a much stronger light source.

To secure the two papers (sketch and drawing sheet) from slipping away, they are attached to each other with paper clips.
I attach one side with two clips so that I can fold up the drawing sheet and take a look at the sketch underneath if necessary.
Of course, the darker the lines on the sketch paper, the easier and clearer they will be to trace.
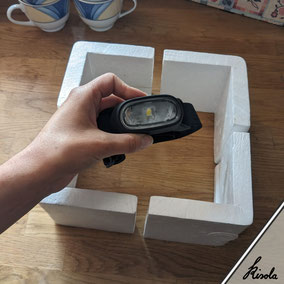
Now we get to the actual constructing of our “box”:
I put my Styrofoam corner-shapes together into a square. They came from furniture packaging and are just the right size to place my camping headlamp in their middle.
You could also glue, nail or pin your items securely onto a base plate to save the hassle of assembling every time!

Now comes the paper tissue. Where I live, commercially available tissues usually consist of four very fine, easily separable layers. I carefully unstick them from one another and pull off two out of four, still connected layers of the whole format.
Similar to the fabric front on a softbox you can find in photo studios, the thin material will help diffuse the light.

My little camping lamp produces a fairly bright, white LED light in a concentrated beam. So I now place my thinned out tissue over this light source.
The mentioned light diffusion helps to illuminate the inside of the box evenly.
Depending on the light source and the distance to the drawing surface, some experimentation led me to the right “setting” for this.

Now comes the drawing surface, in my case it's a piece of 4mm acrylic glass plate that was left over from a DIY project.
Some hardware stores that offer cutting services also sell small leftover pieces of this material!
The plate should be sturdy enough to comfortably draw on without denting.
My plate format of 20 x 20 cm is just big enough for a DIN A4 paper size for drawing.

For this blog article I also tested an alternative build using coffee cups. These are not as high as my Styrofoam corners, so the acrylic glass plate is closer to my light source.
In addition, the cups are heavier and the structure is therefore less likely to slip apart. There are certainly many more ways to use other leftover materials and everyday objects for this!

Light on! Let's start drawing. A darkened room or time after sunset is of course best suited for this, but unfortunately it's not always available.
Turning your workplace with the light box away from windows or shielding it with large-format cardboard can help.
This is what the whole translucent set-up of layers looks like under my drawing sheet.

Line by line, point by point, the new and final ink pen tracing of the pencil sketch underneath is created.
I like to use fineliners for this step, like the Sakura Micron in 0.05 to 0.3mm thickness. Clear and high-contrast lines can be easily scanned and digitized afterwards.
Basically in no time, the contours are all ready drawn and now follows. . .

. . . the colouring!
For the drawing with coloured pencils I use another new sheet of paper. My template below are now the brand new ink pen outlines.
To protect the bottom layer from being damaged by working on it, I insert a second layer of acrylic glas or a thin plastic foil as an intermediate layer between the papers. This means you could also colour without stains using watercolours or markers.

By securing the paper with paper clips again, they can be easily rotated and moved for convenience while drawing. Slight unevenness from slipping papers can be corrected digitally afterwards.
If I don't like the colour distribution or mess up, I can always start over and simply reuse the contour drawing as my template again and again.

Here, both layers of my light box drawings, the contours and the coloured pencil one, were digitized by scanning and then combined in Adobe Photoshop.
Unfortunately, the sheet of the coloured drawing has indeed slipped a bit while drawing. Also slight rotation of the paper in the scanner can cause a shift, but as mentioned before this can be easily corrected using the separate contour and colour layers of your prefered software.
It's also super easy to go back to your light box and create a different colouring (e.g. as mentioned with markers/watercolours or drawings in another colour combination). Or add another layer altogether, as a background.
I really enjoy drawing with my little DIY light box. When the individual parts are not needed, they are stored away in a cardboard box and can be set up quickly if necessary.
Every now and then I come up with ideas for improving the structure, and it's almost as much fun to tinker with the construction as it is to draw afterwards. What more could you want?
As always, the pattern shown and created here can be found as a print on various fabric qualities in my Spoonflower shop.
Please feel free to share your own constructed light boxes with me if the project inspired you to try this out. I would be very happy to see them!
