
Textile Christmas Ornaments
A decorated Christmas tree is something nice, right? Especially with the bitter coniferous forest scent, the festive lights and the shiny baubles - but oh dear, how easily the glassy treasures break when the tree is "admired" by four-legged family members or two-legged offspring . . .
This year I decided to sew some small ornaments out of fabric that are both lightweight and unbreakable. There is no risk of broken glass here !
Unfortunately, they don't shine as beautifully in the light of the tree lights, but the patterns from my "Winter Baking" collection can be seen on the fabric ornaments. This collection of patterns was inspired by the cozy feeling of baking (and eating !) cookies in the winter. Of course, this atmosphere also includes tree decorating !

Although the ornaments require a few tools and materials, they are really easy to sew !
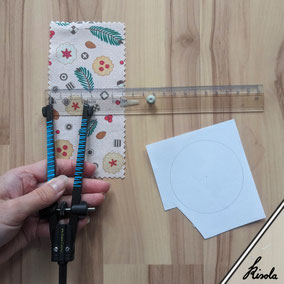
In addition to the fabric, I brought sewing thread, pins and various filling materials to the table. Also some paper, a compass and scissors, as well as zigzag scissors and different ribbons and my trusty pins.
The fabric scraps that I use here come from the test prints of my patterns, half of which I catalog into sample cards. (More about it in my blog article on the topic !)
I use the other halves of fabric, each measuring approx. 15 x 7.5 cm, for small projects like this one.
Half the width of the piece of fabric is set as the radius in my compass.

Using this radius in the compass, a circle is drawn on paper and cut out as a template for cutting the fabric. The circle could now also be traced directly onto the fabric, but I skip this step to avoid marks on the fabric.
For imagining the look of the ornament, you can sketch the planned position of the seam on the template.

I folded my previously well-ironed fabric into two layers and placed the paper template on top.
Holding all layers tightly between your thumb and forefinger, the circles can be cut out quickly and cleanly with sharp fabric scissors, even two at a time !

Two smaller paper circles serve as templates for my filling material.
I saved leftover cotton batting from a quilt for this. The medium-sized one is precisely measured so that the seam will catch the edge of the material.
Otherwise it doesn't matter if the circles aren't perfect ! Loose filling cotton or small scraps of fabric are also suitable.

Now it's 'assembly time': one circle of fabric, two small fleeces, one large fleece, another two small fleeces and one final circle of fabric are put together in this order.
The number of layers of fleece required depends on the thickness of the chosen material and how thick the ornaments should be overall.

My “Winter Baking” collection consists of ten different pattern prints. I had at least one scrap of fabric from each of them, so of course they will all be represented as ornaments on our tree this year !

When my filling material ran out, I used the offcuts. Even smaller snippets from the cutting process can be used between the full circles and used up instead of thrown away.

By pinning the layers together with a few pins, they are firmly secured to one another.
This prevents the filling from falling out or the fabric circles from slipping against each other.

I have now basted the ornament "sandwich" together by hand with large backstitches, which is a nice side task for a movie night.
It's an extra step, but much more comfortable for machine sewing. The circular seam becomes more even as you don't have to stop to pull out pins.

Now comes the mentioned machine seam, going around in a circle.
The smaller the circle, the more difficult it can be - but with a little practice it's no problem!
I set the needle to the left position, so there is a larger distance from the seam to the edge of the circle, which can be easily and evenly maintained with the sewing foot.

Now the decorative edge is cut, the easiest way to do this is with zigzag scissors. Not only does this add a decorative look to the ornaments, but it also prevents the woven fabric I used from fraying.
Of course, the coarser the material, the easier it can fray if handled roughly!

As a finishing touch I wanted to add a small decoration. I made a little bow out of a decorative ribbon and secured it with sewing thread. Unfortunately, this two-color paper tape shown here was a bit too coarse and the color effect was a little too choppy for me. The ends were also too easy to untwist.

I liked the approach with the bow, so I tried a different ribbon for it. There is a great technique for making bows out of textile ribbon using a fork !
This is just a mention at this point, the search engine of your choice will help you with more elaborate information and tutorials.

Sewing the bows onto the fabric ornaments also protects them from unraveling and makes them more stable. At the same time I also made a loop out of the sewing thread to hang the ornament on the tree.
And with that my first textile ornament is all finished and ready for the tree !

And here are all the finished textile treasures hanging on our Christmas tree !
Unfortunately, the sixteen ornaments I made from my existing fabric scraps weren't quite enough to decorate our little tree, which is about 1.20m high. I'll be sewing a few more next year.
Depending on the size of the tree and the desired density of decorations, more or also fewer ornaments could of course be required.
The entire collection of my "Winter Baking" patterns can be found in my Spoonflower shop, using the black link button on the right-hand side above this text. You can also find more information about the collection here on the website, for this please go to “collections” in the main menu.
If you celebrate Christmas, have you decorated your tree yet? Do you still have leftover fabric lying around and want to get a little creative?
Please feel free to share your creations if my project inspired you, I would be very happy to see them !
